Project 7: AI-Powered Geometry Wars Agent
Data gathering and Feature Engineering for Training Data
Background
The Convolutional Neural Network (CNN) will analyze gameplay footage to detect and identify key elements such as the player, enemies, and gates on the screen. The extracted information will then be processed and formatted to enable the Reinforcement Learning (RL) layer to make informed decisions and learn from their outcomes.
Data Requirements
To ensure optimal performance, the data must be clean and as simple as possible. The objective is to minimize image complexity while maintaining a fast processing pipeline to allow the Agent to respond as close to real time as possible. A Convolutional Neural Network includes various steps which already do separate color channels and perform edge detection. I decided to still implement a pre-processing of the data for following reasons:
- Practice in image data manipulation / pre-processing.
- Getting the CNN to focus on edge information as I already know that this is the most important in my dataset.
- Colors are not important in Geometry Wars and I don't want the CNN to learn based on the colors especially due to the game including a lot of visial effects like explosions etc.
- I want to be able to reduce computational power. I valuated the pre-processing and noticed a size decrease of up to 20 times.
The following structured process will be implemented to collect training data, with the same methodology being applied during the CNN's real-time inference:
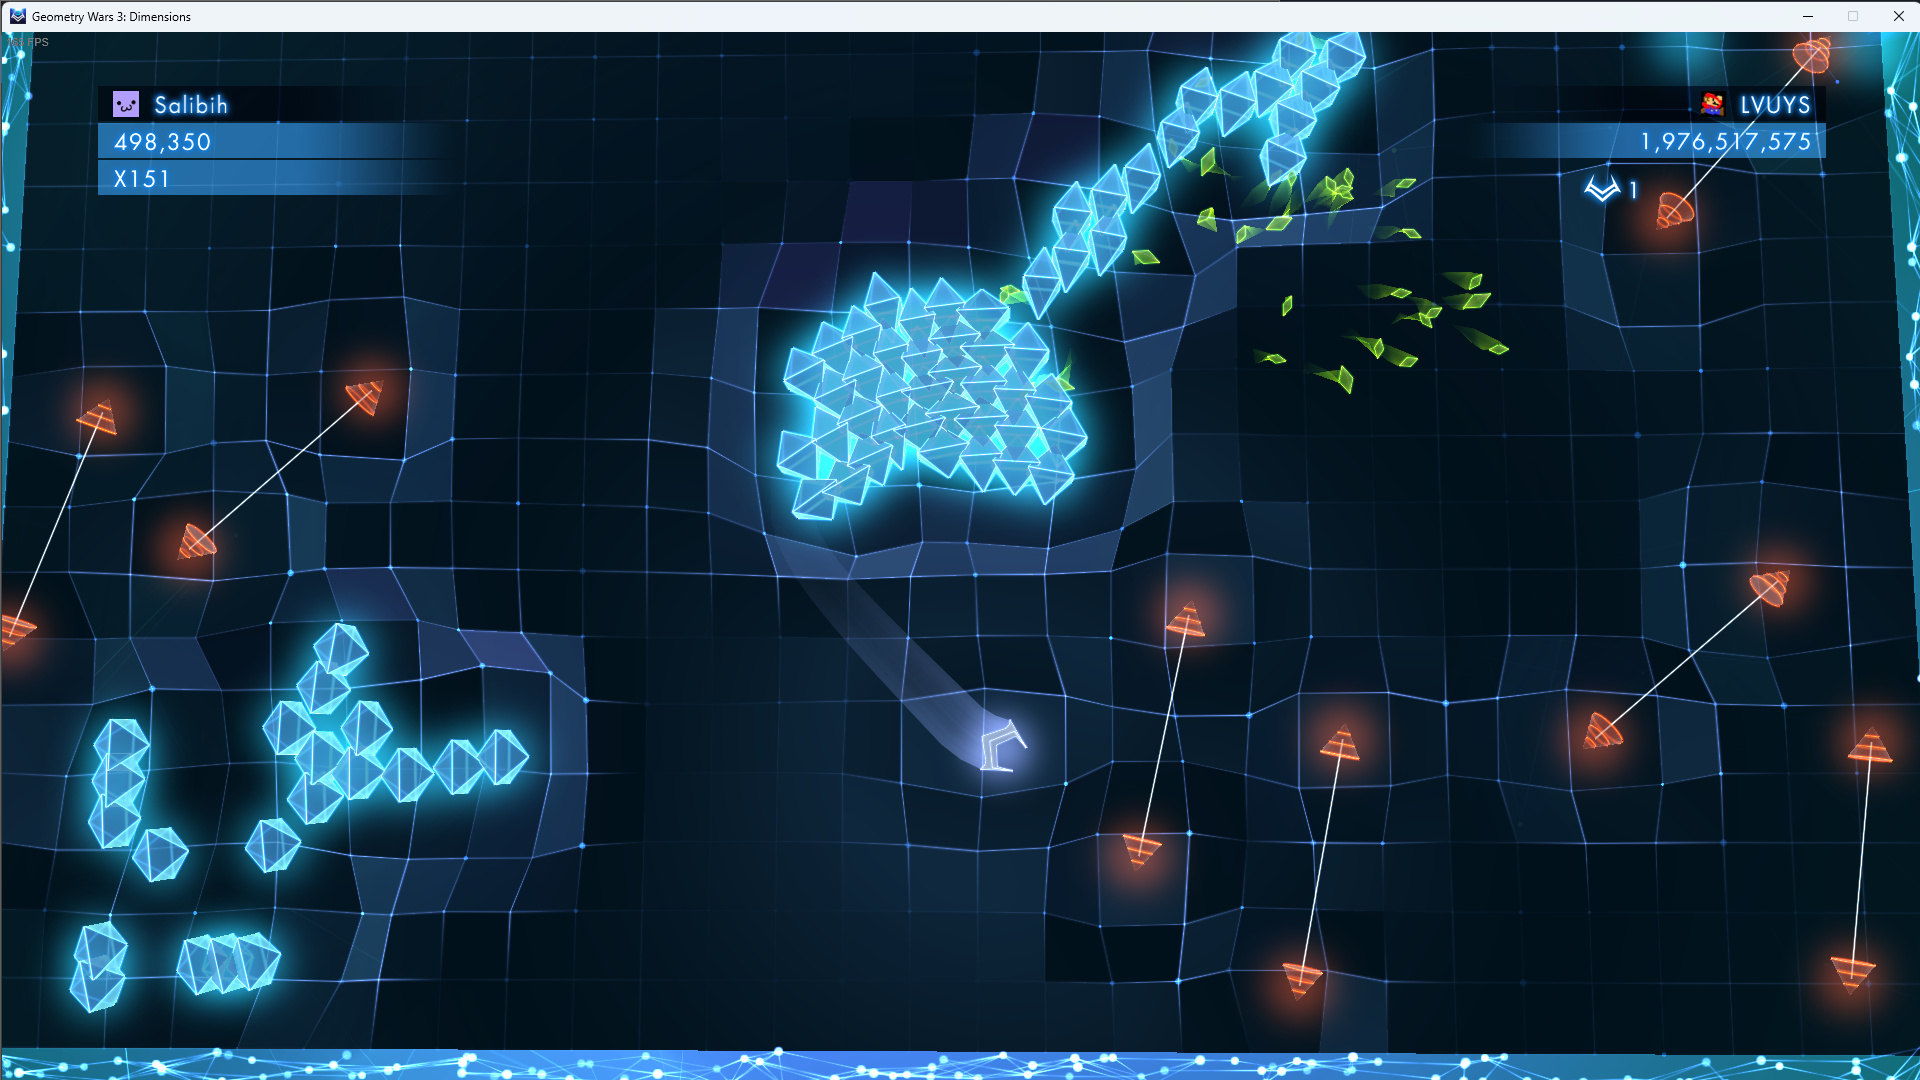
- A screenshot of a predefined screen area will be captured at regular intervals.
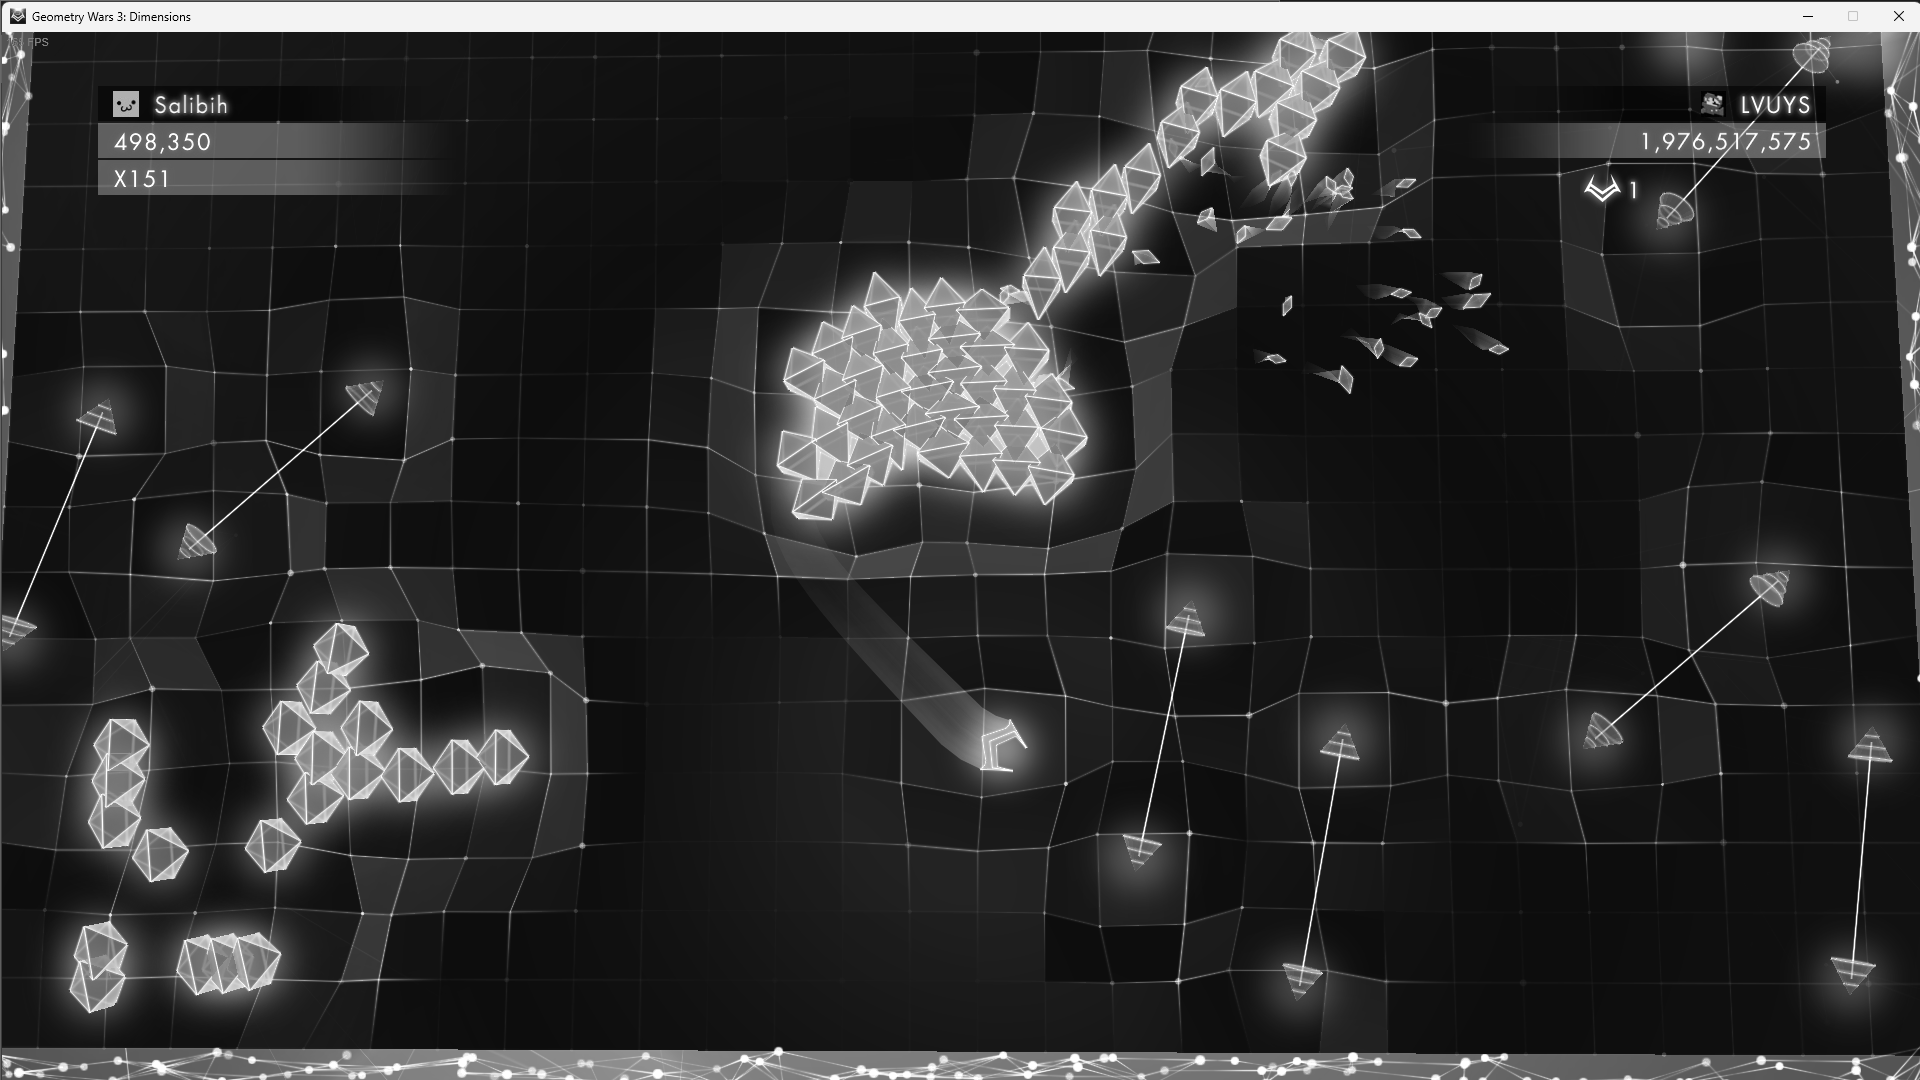
- Each captured screenshot will be converted to grayscale to reduce visual complexity and enhance processing speed.
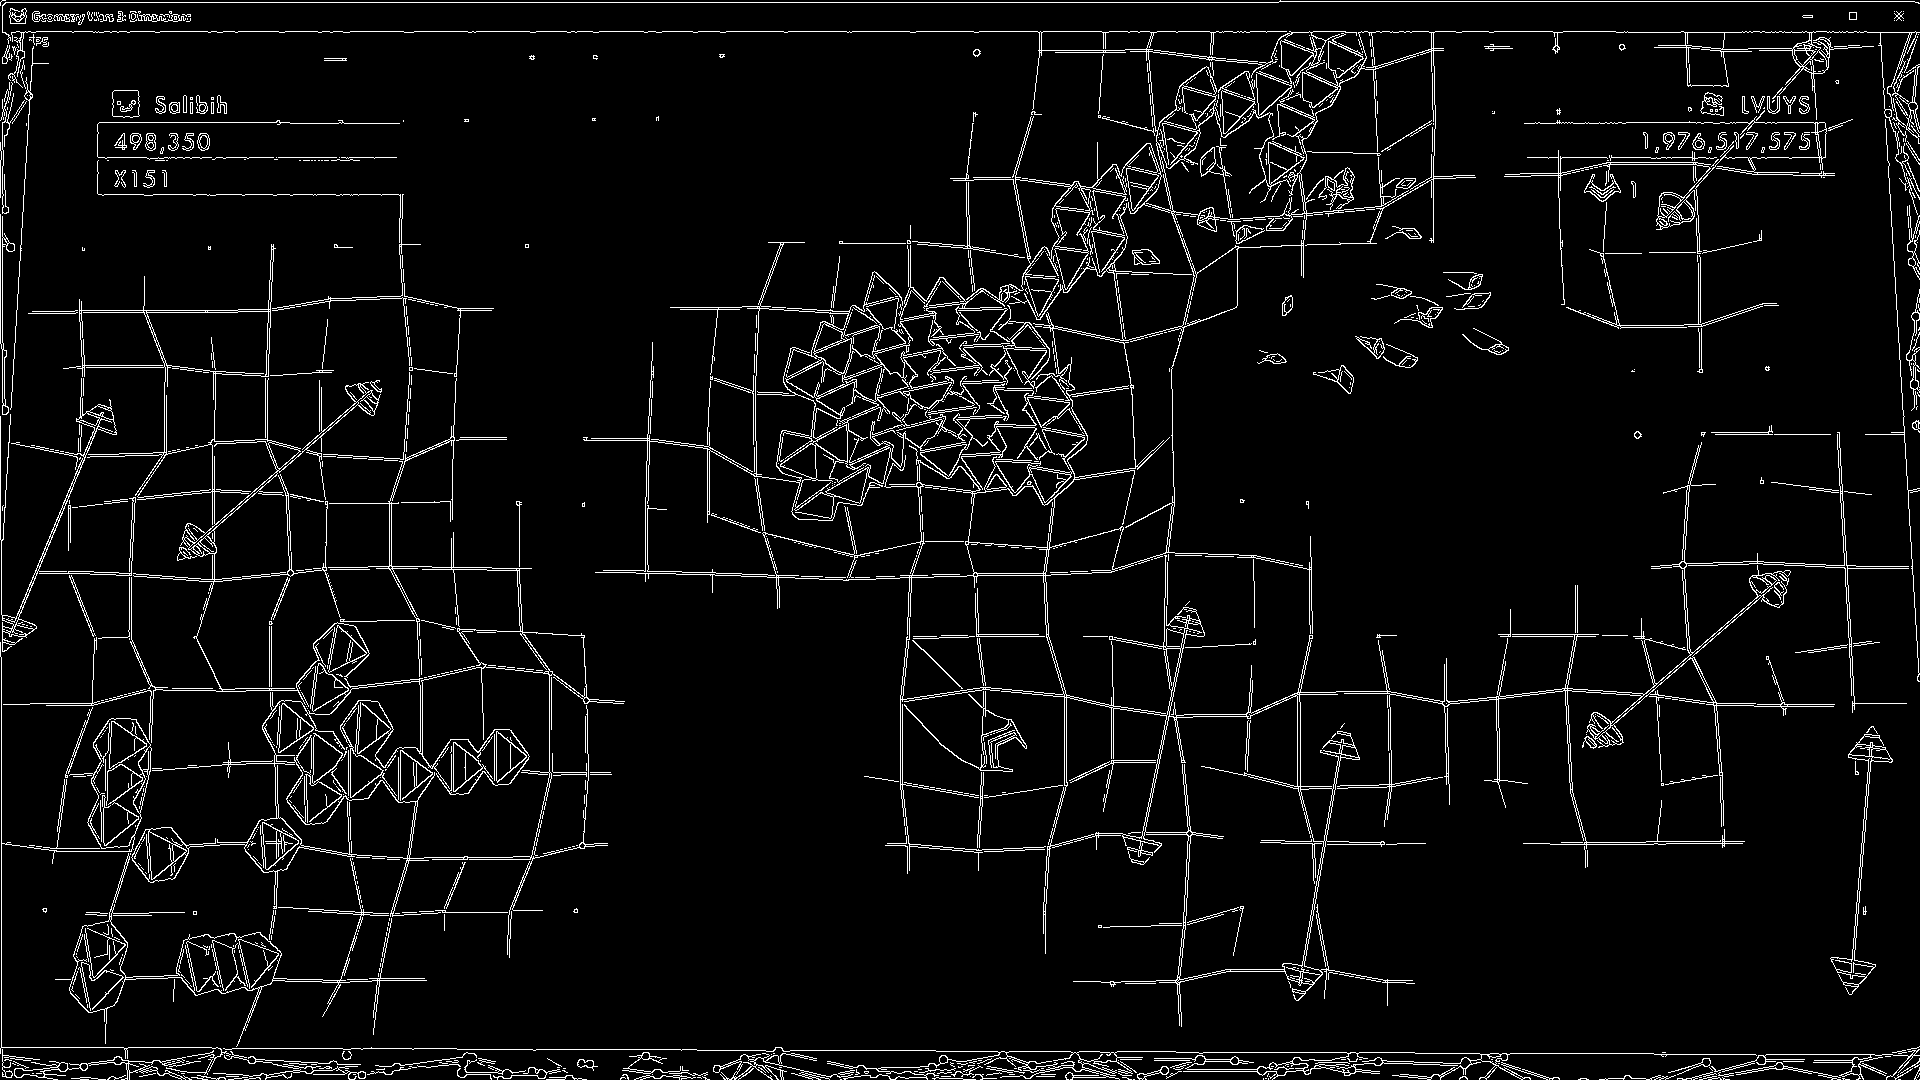
- Further simplification will be applied through edge detection to highlight essential features and discard unnecessary details.
- The Points and Multiplier should be extracted and stored.
- The processed images will be annotated using CVAT.ai, a widely recognized annotation tool for machine learning applications.
- The annotated dataset will be exported in a format that allows for further usage with a CNN.
For this project we will focus on YOLOv8 (You Only Look Once) which is a type of Convolutional Neural Network (CNN), specifically designed for real-time object detection. Unlike traditional object detection methods that use region proposal networks (like R-CNN or Faster R-CNN), YOLO treats object detection as a single regression problem, predicting bounding boxes and class probabilities in a single pass through the network.
Step 1 - Taking a screenshot every x miliseconds
def capture_screenshots(interval_ms):
    with mss.mss() as sct:
        print("Screenshot capture started. Press Ctrl + C to stop.")
        try:
            while True:
                screenshot = sct.grab(capture_region)
                img = np.array(screenshot)
                timestamp = int(time.time() * 1000)
                file_path = os.path.join(output_folder, f"frame_{timestamp}.png")
                cv2.imwrite(file_path, img)
                print(f"Saved: {file_path}")
                time.sleep(interval_ms / 1000)
        except KeyboardInterrupt:
            print("\nScreenshot capture stopped by user.")
        except Exception as e:
            print(f"\nError occurred: {e}")
Step 2 - Applying GreyScale to the Screenshot
def process_images_to_grayscale(input_folder, output_folder):
grayscale_images = {}

for filename in os.listdir(input_folder):
	if filename.endswith(".png") or filename.endswith(".jpg"):  # Check for image files
		input_path = os.path.join(input_folder, filename)

		img = cv2.imread(input_path)
		if img is None:
			print(f"Skipping {filename}, unable to read.")
			continue

		gray_img = cv2.cvtColor(img, cv2.COLOR_BGR2GRAY)
		grayscale_filename = f"{os.path.splitext(filename)[0]}_greyscale.png"
		cv2.imwrite(os.path.join(output_folder, grayscale_filename), gray_img)
		print(f"Stored grayscale image: {grayscale_filename}")

		grayscale_images[filename] = gray_img

return grayscale_images
Step 3 - Applying Edge Detection on the Screenshot
def process_images_edge_detection(grayscale_images, output_folder):
edge_detected_images = {}

for filename, gray_img in grayscale_images.items():
	edges = cv2.Canny(gray_img, 100, 200)
	edged_filename = f"{os.path.splitext(filename)[0]}_edgedetection.png"
	cv2.imwrite(os.path.join(output_folder, edged_filename), edges)
	print(f"Stored edge-detection image: {edged_filename}")

	edge_detected_images[filename] = edges

return edge_detected_images
Step 4 - Get current Score and Multiplier
Getting the current score as well as the multiplier will be crucial to validate the AI Agent as well for rewards calculation. As I expect the CNN to be once of the more complex parts I aimed at keeping the work for it as low as possible. This means extracting the score and multiplier should not be done with the CNN but rather by implement more lightweight Optical Character Recognition (OCR). This can be done using Tesseract OCR.
Note: Tesseract for Windows has been installed from this page.
def ocr_score_multiplier(image_path, output_folder):

#load the processed grayscale image
processed_image = cv2.imread(image_path)
if processed_image is None:
	print(f"Error: Unable to read image {image_path}")
	return

#fixed coordinates for Points and Multiplier areas (xtl, ytl, xbr, ybr)
points_region = (97, 122, 401, 158)  # (xtl, ytl, xbr, ybr)
multiplier_region = (97, 159, 401, 195)  # (xtl, ytl, xbr, ybr)

#crop the defined regions
points_crop = processed_image[points_region[1]:points_region[3], points_region[0]:points_region[2]]
multiplier_crop = processed_image[multiplier_region[1]:multiplier_region[3], multiplier_region[0]:multiplier_region[2]]

#preprocess images (convert to grayscale and threshold for better OCR)
points_crop_gray = cv2.cvtColor(points_crop, cv2.COLOR_BGR2GRAY)
multiplier_crop_gray = cv2.cvtColor(multiplier_crop, cv2.COLOR_BGR2GRAY)

_, points_thresh = cv2.threshold(points_crop_gray, 150, 255, cv2.THRESH_BINARY)
_, multiplier_thresh = cv2.threshold(multiplier_crop_gray, 150, 255, cv2.THRESH_BINARY)

#OCR settings to focus on digits and special characters
custom_config = r'--psm 7 --oem 3 -c tessedit_char_whitelist=0123456789x'

#extract text using Tesseract OCR
points_text = pytesseract.image_to_string(points_thresh, config=custom_config).strip()
multiplier_text = pytesseract.image_to_string(multiplier_thresh, config=custom_config).strip()

#store the results in a text file
result_filename = os.path.splitext(os.path.basename(image_path))[0] + "_ocr_results.txt"
result_path = os.path.join(output_folder, result_filename)

with open(result_path, "w") as result_file:
	result_file.write(f"Points: {points_text}\n")
	result_file.write(f"Multiplier: {multiplier_text}\n")
 OCR Result for Points and Multiplier
Step 5 - Annotation of the Screenshot
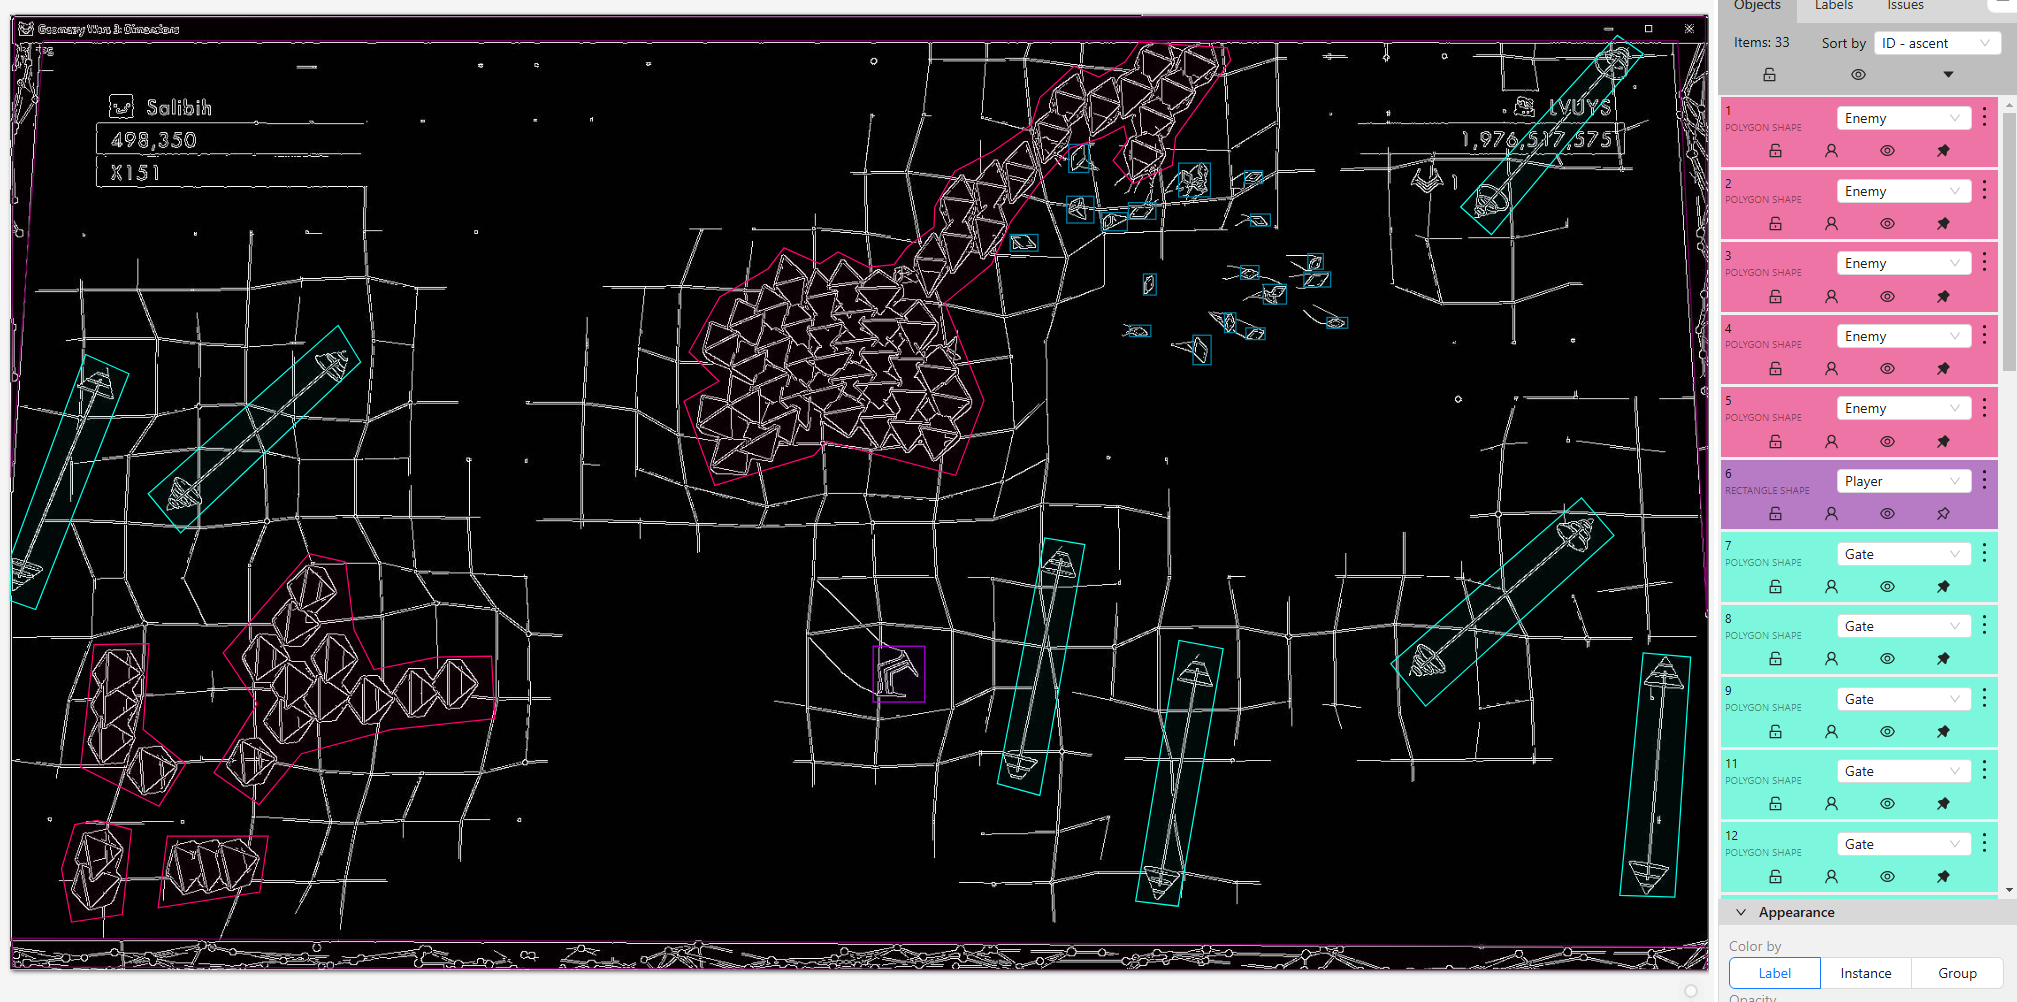
The Annotation of the screnshot is a manual process where all objects must be labeled. For this process CVAT.ai will be used.
One of the big challenges is to decided whether to use object detection (bounding boxes) or segmentation (polygons). The ideal solution may lie in between and be a hybrid solution which will require to run two processes simoultaniously having one YOLOv8 instance identifying the bounding boxes and one the segementations. This is required as YOLOv8 does not support a hybrid mode. You either train it for segmentation or bounding boxes. As an alternative keypoint detection could be included as well where critical points (e.g., corners of the gate) are detected instead of full segmentation.
Step 6 - Export Annotation Dataset
The annotation dataset was exported using the YOLO 1.1 format, which is well-suited for training object detection models. This format provides the necessary information to detect key elements in the game such as the player, enemies, gates, and multipliers.
The exported dataset includes the following key components:
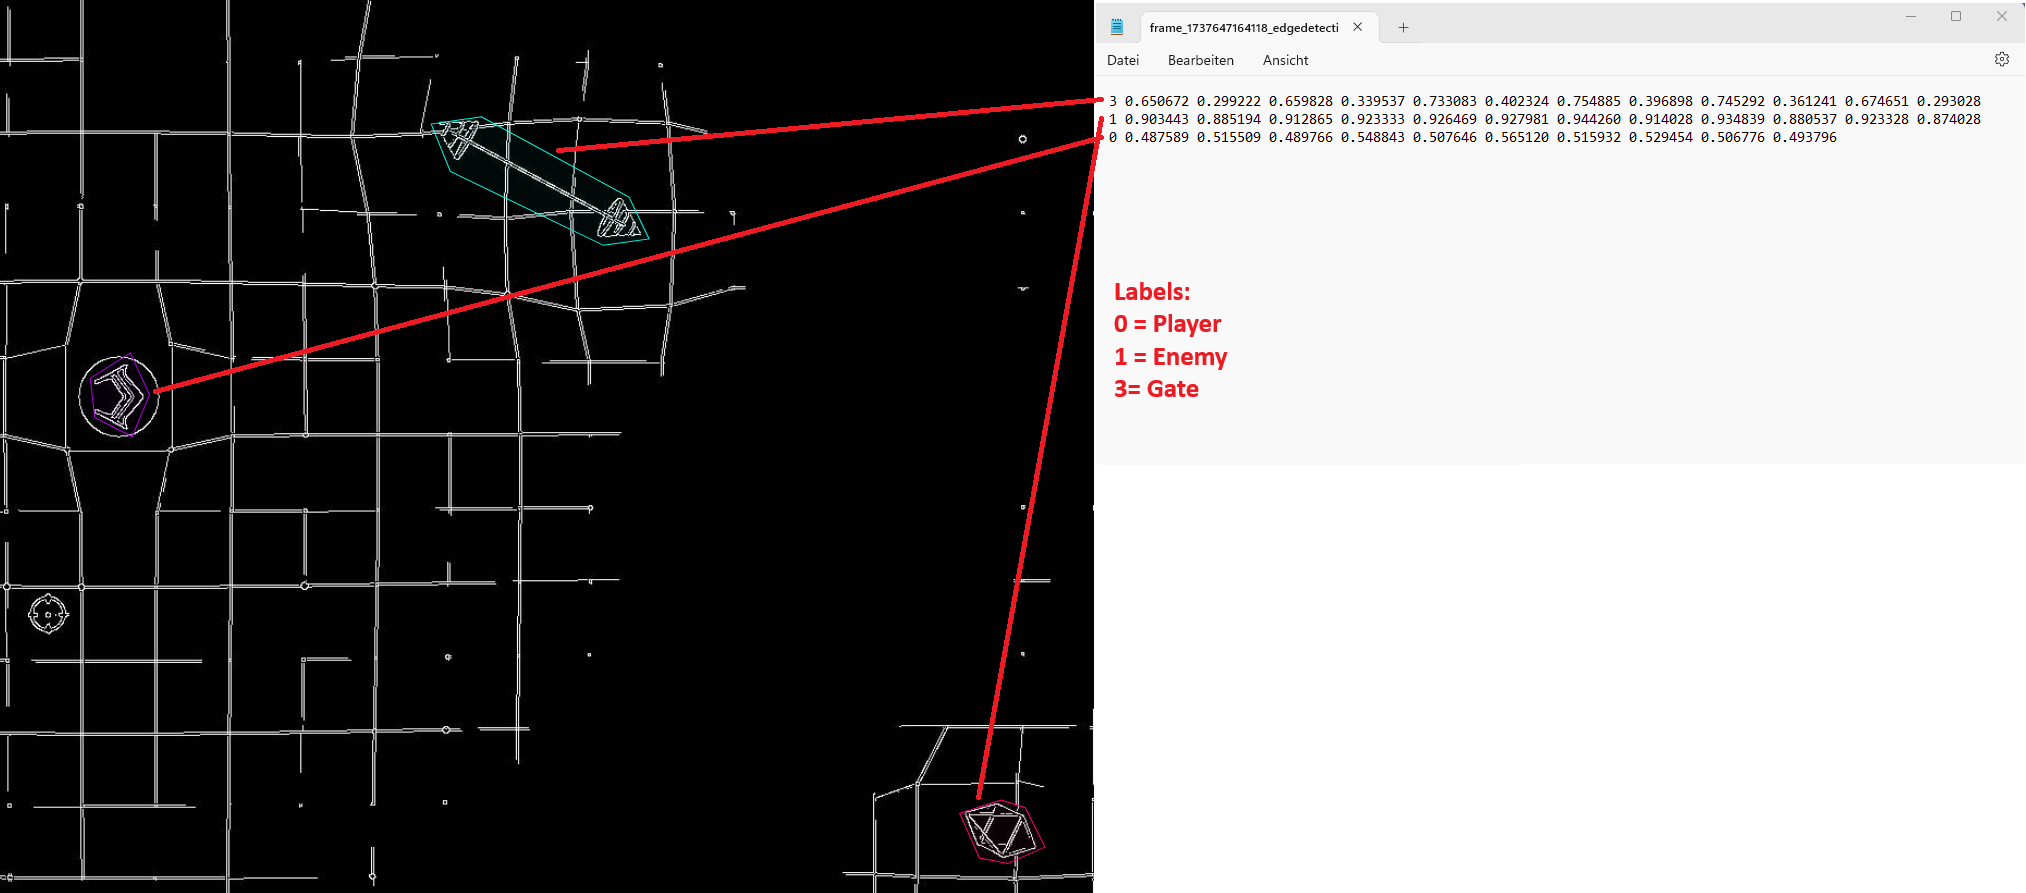
- Annotations: Each image has a corresponding text file containing object labels and bounding box coordinates in the YOLO format: class_id, x_center, y_center, width & height.
- Labels: Objects annotated in the dataset include "Player," "Enemy," "Gate," "Multiplier," and "Border," each assigned a unique identifier.
- Image Information: The dataset contains the image name which allows to relate the dataset to the underlying image.
- Metadata: The dataset export includes task details such as the project name, creation date, and annotator information.
 Annotation Export in YOLO 1.1 format
Besides the comprehensive xml file CVAT.ai also offers to download the dataset in form of one text file per iamge which includes the labels and coordinates. Following an example of how this text file looks like for a segementation labeling (more details about segmentation can be found in part 3).
Dataset Size Considerations
Determining the appropriate dataset size is crucial for training an effective Convolutional Neural Network (CNN). The number of labeled images required depends on the complexity of the environment, the number of object types, and the variability of object positions within the game. Below is a general guideline for estimating the number of labeled images needed based on the complexity of the scenario.
| Object Detection Scenario | Suggested Number of Labeled Images |
|---|---|
| Simple (few objects, easy features) | 500 - 2,000 images |
| Moderate (multiple objects, moderate variation) | 3,000 - 10,000 images |
| Complex (many objects, high variability) | 10,000 - 50,000+ images |
Recommendation from ChatGPT: For this Geometry Wars project, which involves detecting multiple dynamic objects such as enemies, gates, and the player in a fast-paced environment, a dataset of at least 3,000 to 5,000 images is recommended for achieving reliable performance. For higher accuracy and robustness, collecting 10,000+ labeled images with data augmentation techniques is ideal.
For the full Proofe of Concept (PoC) a small size of only 500 samples will be used and tested. Single function Proofe of Concepts will include only 200 samples due to the high effort in labeling each image manually. The sample size may be increased in the future depending on the results with small sizes.